A patio isn’t just a flat rectangle. The spaces you actually use—lounging, dining, grilling—are shaped by three quiet heroes: seating walls, front entry steps, and strong borders. Get those right and your paver patios feel bigger, safer, and easier to maintain for years.
Why this trio matters
- Flow: Steps and seat heights guide how people move (and where they stop).
- Durability: Borders + edge restraint keep lines tight through freeze–thaw.
- Comfort: A cap at bench height (18–20″) adds instant overflow seating—no extra furniture needed.
Design the flow before you pour base
- Zones: lounge, table, grill—give each breathing room and clear walk paths (36–48″).
- Sightlines: seat walls frame views; keep caps below railing height to protect sightlines.
- Access: align steps with doors and high-traffic routes; avoid diagonal “side shuffle” approaches.
The base recipe (what keeps everything honest)
- Excavate to depth for pavers/steps/walls as a system.
- Compact in lifts (moisture-conditioned base) for real density.
- Screed layer laser-true before laying pavers.
- Edge restraint spiked on the outside of the field—no restraint, no crisp lines.
Steps that feel safe
- Identical risers (⅛–¼” tolerance max).
- Landing depth at doors: 4–6 ft so you don’t back down a step to open.
- Contrasting nosing or border at edges for nighttime visibility.
- Handrail-ready: plan post sleeves/footings during the build, not after.
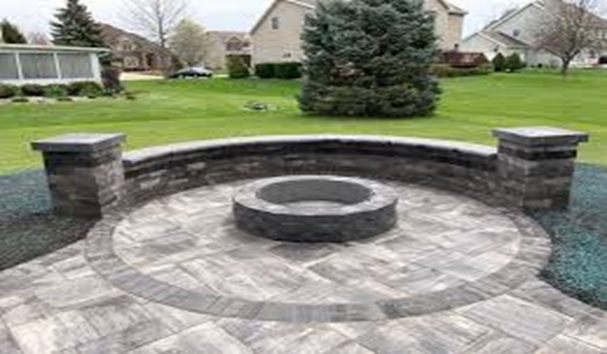
Seating walls that do double duty
- Bench-height caps (18–20″) turn structure into seating.
- Back-to-back with grade: use the wall to hold a small rise and gain a flat, usable zone.
- Drainage behind every wall (stone + perforated pipe to daylight/basin). Water, not gravity, causes most failures.
- Geogrid where height or surcharge demands it—follow manufacturer embed lengths.
Borders that protect the field
- Soldier course (contrasting) frames the patio and resists edge scuffing.
- Flush mower edge at lawn interfaces to cut string-trimming time.
- Border first, then beds: finish materials (mulch/rock) sit slightly below the edge so they don’t bleed onto pavers.
Drainage first, beauty second
- Pitch surfaces 1–2% away from structures.
- Route downspouts beyond traffic lines; never dump onto the patio.
- Catch or channel drains only where grade can’t solve it—keep grates above finish grade.
- Tie every choice back to drainage solutions so hardscapes don’t fight water all season.
Materials & textures (use the weather to your advantage)
- Textured pavers = better wet traction.
- Large-format slabs look premium; pair with textured borders for grip.
- Cap stones with eased edges are friendlier on legs (and packages).
- Color discipline: two tones (field + border) read clean; a third tone for caps is the accent.
Build sequence (what good crews actually do)
- Layout, utilities locate, surface protection.
- Excavation and base install in lifts.
- Retaining walls/seating walls to design height with drainage set.
- Steps formed and set; confirm rises with a story pole.
- Field pavers laid; edge restraint and border installed.
- Compaction and joint sand; hose-test pitch and outlets.
- Final grading, sleeves pulled for future lights, sweep and rinse.
Maintenance in minutes
- After big rains, check edges and clear grates.
- Top up joint sand at borders each spring.
- Keep bed materials below the border line; blow debris off faces and steps monthly.
Bottom line
Plan the hardscapes as a system: walls shape space, steps make it safe, borders keep it tidy. Pair that with a real base and a water plan, and your patio will still look dialed-in years from now.
As you compare designs and crews—think search terms like paver patio Lebanon OH—keep those fundamentals in view no matter where you live: water management first, identical risers, bench-height caps, and borders locked with edge restraint.